Showing posts with label Jewellery. Show all posts

Monday, April 15, 2013

Earrings: The Shiny Gold Shirt

My Brother is one of those guys who is so cool he can get away with anything. Right now, for instance, he has a greasy short pony tail, and bobby pins back his bangs, but he is still the coolest kid. He is the kinda person that sets trends, though I hope others are smart enough not to follow the pony tail trend. If he starts wearing baggy cargo pants, so do all the kids in his fan club. I really like him, he is a really nice, caring, hilarious, fun guy, but he can be a bit odd at times. Right now he is a folk singer song writer. His group is called Bronson and the Angels. However, he was not always a musician.

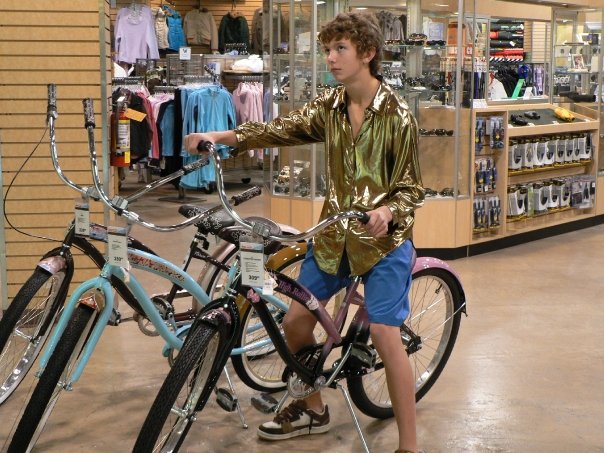
My Brother used to be really into basketball. He was super good and played for our provincial team! During that time, being the high school jock that he was, he was invincible in his coolness factor. I think he was in grade 9 or 10 when he went on a summer tournament to San Francisco. He wanted to make a statement at this tournament. He found the most intense gold shiny shirt at Value Village (thrift store), so he decided to wear it...everyday. This shirt made a statement for sure! It was probably a really nice shirt wear to the disco if you were over the age of 50 20 years ago. But, in the 21st century, it was not popular amongst high school boys.

I'm not sure if he still has the shirt tucked away in a safe keeping box somewhere, but I have not seen it in the last 5 years. However, when I was looking through my mom's button box, I came across two buttons from the shirt that had the same fabric on them. Though I would not wear the shirt now, I think the fabric is nice in small button sized quantities. So I decided to make them into earrings.

What I did:

This project probably took me less than 5 min. The buttons were shank style buttons, so they had a loop on the back. I took my pliers and cut the loop off so they would lie flat, this left a messy hole in the back, but that didn't matter. I then took some craft earring studs, and glued them onto the back of the button. I let the glue dry over night to be sure it was good and secure. I wore them the next day! Presto!


Friday, March 8, 2013

Necklace Holder: I Need Two!


The Necklace Holder is common right now. You could probably find 10 tutorials on pinterest that look exactly like mine! In fact my sister-in-law-to-be has a tutorial on it on her blog called I can eat that. Regardless I wanted to switch up where I put my necklaces, and I thought it was cute.

I now realize, looking back, that I did not make it big enough. I have way too many necklaces for just four nobs. Maybe the problem is that I have too many necklaces that I never wear. I should probably recycle some of those necklaces. Who am I kidding, that is never going to happen.

It took me a while to get started because I needed to find the perfect piece of drift wood. It was late fall when I decided to start this project, and trips to the beach are just less prevalent when its cold outside. I eventually made it there, but of coarse it was dark outside so the search was not much easier. I found one that I liked. It was so perfect. The right size, the jagged edges, extremely worn, and everything I hopped for! Then, I turned it over, and it was burnt on the bottom. It was too bad, but I was already in love with it. I decided to make it work.

What I did:

I started by drilling 4 holes through the drift wood. The holes were in the middle viertically, but not to the edges of the drift wood, because I wanted the sides to stick out.

I choose a random collection of nobs to put on. This was partly because I liked the eclectic style, and partly because there were not four of the same. I placed the nobs through the holes and ran into my first problem.The screws were not long enough to make it to the back.

I took it to the shop, and used the table saw* to make the piece thinner. It worked for the most part, except for one screw that was really short. I had to drill a larger hole in the back to fit the bolt into. I got the screws in and I was happy with it! I knew, however, that my landlord would not be happy. If I hung it on the wall the way it was, the screws would scratch the wall because they stuck out the back.

To fix this it was not hard at all. All I had to do, was put two small wooden pieces on the back, that stuck out further than the screws. That was a quick and easy fix. Finally, I just had to hang it. I cut a long piece of rusty wire, because I wanted the rustic/vintage look. I wrapped each end around the screws tightly to hold it in place. I put a nail in the wall and hung it on the nail. That's it!


*My Dad used the table saw. I would kill myself if I tried.

Wednesday, March 6, 2013

A Necklace: Inspired by Octopus balls

One of my favourite ways to spend a summer weekend evening, is at the Richmond Night Market, or is it the Summer Night Market. Ill be honest, I get so confused which is which. Regardless, there is so much great stuff. I always used to buy all my school supplies such as pens, notebooks, pencil cases, ect. there. I also bought my phone case, some pants, jewellery, movies, and a LOT of food from there.

My favourite part of the evening, is when we walk through the food isle. It smells so good, and I get so excited about all the food that I want to eat! Its so crowed in the food isle that I often consider taking a squid leg out of a stranger's bowl and hoping they don't notice. I haven't done this yet though.

The one thing that I buy most often is Octopus balls. It might not be my number one favourite, but the price is right, there is never a huge line up, and they are very delicious! If you have never had an Octopus ball I will advise that, as long as you like sea food, you try them! They are a doughy ball with Octopus chunks in it, simple and amazing! I was first introduced to this beauty, by my good friend +Anne-Marie MacIntosh. She deserves some cred.

Since I almost always over eat when I am there, the rest of the night is slightly less enjoyable, but still a good time none the less. When the boys are staring at either game or swards I sneak over to the Jewellery booths.

Once I saw a necklace that I loved, but I was short on cash and decided not to buy it. However, I decided to make it! Now, looking back, I am not sure why I loved it. I think I have only worn it once since I made it two years ago. I still like it, but its just doesn't go with my outfits. Maybe someone else will appreciate it more than me.
Photo Credit: David Chung

What I did:

I bought a cheep grey necklace from Value Village with bigger beads. I then picked a green ribbon that matched. I threaded a medium sized needle with thick sewing thread*. First, I strung the ribbon leaving a foot at the end. I then strung a bead, and wrapped the ribbon to the top of the bead and strung it again. Basically you sting the ribbon back and forth, but put a bead between each ribbon string. Follow the pattern until you either run out of beads, or its long enough. Cut the ribbon so that there is a foot remaining after the last bead. Tie a nice bow with the two long pieces of ribbon to close the circle. Finally, thread the sting through the bow a few times to ensure it does not come undone. Tie the sting and cut it off. Its finished!

*I would suggest not using anything with Spandex (stretchy)

Tuesday, February 26, 2013

A breifcase: From Trash to...Cosmetic Organizer

I have always loved vintage briefcases and suitcases. I remember when I was a little girl, and would go antique shopping with my mom, I would always want her to buy either sewing dressforms, or suitcases. I still threaten to buy her dressforms every year for her birthday and Christmas, but since I have my own place now, I want all the suitcases to myself.

I was leaving my parents house one day and just two houses down I spotted my prize. It was garbage day and there were two briefcases sitting on the curb. My day was complete!

One was brown and only need a 5 min polish to get rid of some dirt. The other was a hard black case that was nice, but now really what I was wanting. So I went on Pinterest to get a few ideas; honestly I didn't find much I liked. Since I don't actually need a briefcase for normal use, I decided I was going to use it as a cosmetic organizer. So I decided to start, and hoped for the best.

What I did:

Photo Credit: David Chung
I taped the metal frame so that I could paint freely. I started with a primer because the case was plastic, and I didn't want the paint to chip off. I then found some blue paint, and mixed a few until I came up with a blue that I liked. I did two coats of the blue to be sure it covered really well. I waited probably a week before I went to the next step, because I want to be sure the paint had time to harden.

I measured out where the green lines should be, and taped the space off for perfect lines. I again mixed a few colors to make sure the green matched the blue. Again, I painted two coats of the green, just because it didn't fully cover the first time. Finally, i took the tape off and was very pleased with the result.

Once I finished the outside I started on the inside. I pulled out all of the insert parts so it was just an empty shell. This was harder than it sounds, because this briefcase was made tough, and the seams were no exception! I cut up an old cereal box and shaped it into small boxes, to use separate the sections.

It is big enough inside to hold almost everything except my hair dryer. Now I can get ready in my bedroom, and not worry about my room mates showering when I want to put on my make-up. Better yet, it is decorative at the same time!


Photo Credit: David Chung