I started this blog after I got engaged. I knew, that that time, that most of the crafts I planned to make, were going to be for my wedding.
Well it turned out to be true. I have been crafting a normal amount lately if not more than normal, and I have not made any crafts that I want to blog about. The thing is, I want all the crafts at my wedding to be new and exciting. I don't want people to walk into my reception and whisper to their friend: "I know exactly how she made those flowers, dresses, necklaces...ect. Even though you might think they look impressive, its actually really easy." I want people to walk in and whisper to their friend: "WOW, thats so cool, where did she find such a cool object! Its so unique!"
Its tough to not blog about my crafts, let alone tell people about them. I would not say that my number one skill is with keeping secrets, when I get excited about something, I just want to tell people! I am so proud of so many of the crafts that I made so far but am really struggling to keep them a secrete.
The funny thing is that I knew this was going to happen as soon as I started the blog. Why couldn't I wait just 7 more months!? When I get excited, I cant hold it in! So I started, and started too early, and now have nothing to share.
In the end this blog post is about nothing really, just that I want to blog, but I cant. :(
Wednesday, May 8, 2013
Wednesday, April 24, 2013
Canadians: A Painting
Canadian's are not known for their patriotism, but we love things that are Canadian. We love outdoor gear like rain, snow, and other winter jackets. We love our landscape, like the mountains, the rivers, the lakes, and the Prairies. We love to hear how Americans stereotype us, and think we live in igloos, even though most of us have never even seen an igloo. We love outdoor adventures like hiking, biking, fishing, hunting out our back door, and others. We love our local animals, like Bears, Moose, Foxes, and Salmon (but not the Geese). And we LOVE hockey!
This was a project I did was about our local animals. Its a Black Bear! We are more known for our Grizzly Bears in this area, but they are much scarier, and not as common to see.
I chose to do a Black Bear because, for some random reason, I like to paint things for my younger brother. Its not that I don't like painting for my older brother, but his wife is 1 million times better, so it would be pointless. I told him I wanted to paint him something that I could paint a solid color, he wanted to be sure it was something manly, so we picked a Black Bear. It was fitting with the color of choice.

What I did:
It was a very easy craft! I looked up a few pictures of bears online so I could remember exactly what they looked like. I then covered a cheep dollar store canvas in news paper clippings. I cut out small pieces because I wanted it to be all words, and the news paper normally has a lot of pictures. You could also do this with book pages, but I was more willing to cut up my news paper than a perfectly good book.
I used a glue and water mixture to put the paper onto the canvas, then I sealed it on top with the glue and water.
Lastly, I painted a picture of a Black Bear on top. If you are not good at painting, here is a cheater idea for this project. Print off a picture of a simple object(like the bear) in the right size. Then, cut out the picture slightly smaller than it is. Trace around the cut out onto the canvas, and paint inside. Since you cut is slightly smaller, it allows room to go out of the lines if there is a mistake.
Finished!
Monday, April 15, 2013
Earrings: The Shiny Gold Shirt
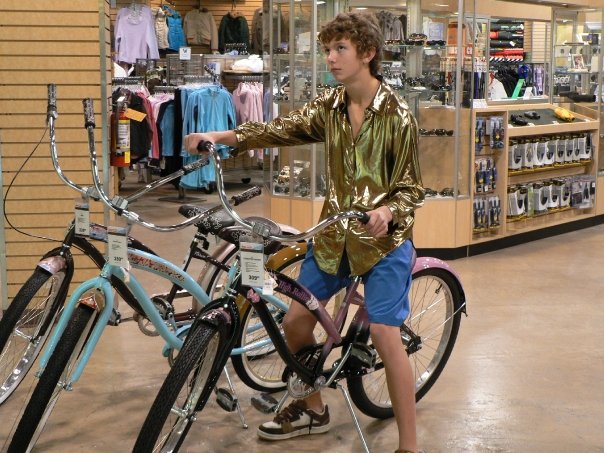 My Brother is one of those guys who is so cool he can get away with anything. Right now, for instance, he has a greasy short pony tail, and bobby pins back his bangs, but he is still the coolest kid. He is the kinda person that sets trends, though I hope others are smart enough not to follow the pony tail trend. If he starts wearing baggy cargo pants, so do all the kids in his fan club. I really like him, he is a really nice, caring, hilarious, fun guy, but he can be a bit odd at times. Right now he is a folk singer song writer. His group is called Bronson and the Angels. However, he was not always a musician.
 My Brother used to be really into basketball. He was super good and played for our provincial team! During that time, being the high school jock that he was, he was invincible in his coolness factor. I think he was in grade 9 or 10 when he went on a summer tournament to San Francisco. He wanted to make a statement at this tournament. He found the most intense gold shiny shirt at Value Village (thrift store), so he decided to wear it...everyday. This shirt made a statement for sure! It was probably a really nice shirt wear to the disco if you were over the age of 50 20 years ago. But, in the 21st century, it was not popular amongst high school boys.
I'm not sure if he still has the shirt tucked away in a safe keeping box somewhere, but I have not seen it in the last 5 years. However, when I was looking through my mom's button box, I came across two buttons from the shirt that had the same fabric on them. Though I would not wear the shirt now, I think the fabric is nice in small button sized quantities. So I decided to make them into earrings.

What I did:
This project probably took me less than 5 min. The buttons were shank style buttons, so they had a loop on the back. I took my pliers and cut the loop off so they would lie flat, this left a messy hole in the back, but that didn't matter. I then took some craft earring studs, and glued them onto the back of the button. I let the glue dry over night to be sure it was good and secure. I wore them the next day! Presto!

Wednesday, April 10, 2013
Wine Bottles: I love to Recycle
The Truth is, I like to Recycle. I'm not a recycle fanatic or anything, but I due value recycling.
I think my room mates have a different opinion about recycling than I do. I usually take the garbage and recycling out most weeks to be collected, and it can be a bit of a struggle. I'm not sure if they don't know, or if they just don't care, that the cardboard needs to be flattened, the jars need to be rinsed, the paper needs to come off, ect. But really I don't mind the extra 5 min to clean it all up. That's not really the hard part for me, the part that bothers me the most is what people DON'T recycle. When I take the garbage out and find plastic containers, to-go cup lids, paper, plastic bags, cardboard boxes, and so many other things that could be recycled in the garbage, that rubs me the wrong way. I usually pick out the things on the top of the garbage, but I don't really want to dig down into the garbage to pull everything out. Especially since we don't have a compost so there is rotting food in our garbage. I also am passionate about compost, but that's another story.
I would like to to be clear that I am not a nag when it comes to Recycling. At least not yet, or not with my current room mates. The odd time I will casually mention that certain things can be recycled, or that they need to be cleaned a specific way. However, this very rare since my room mates are not usually home when I take out the garbage and recycling.
The one thing I like more than recycling, is reusing or re-purposing, or (the new trendy word) up-cycling. I saw a craft on Pintrest, that was actually from Etsy, and decided to make it my own.

What I did:
I first spray painted the bottles with two coats of a special glass paint, so that my paint would not chip off later. I then made some chalk paint: 2 Tbs fine tile grout mixed with 1 cup craft paint. I wanted to be able to write what ever I wanted on the bottles, which is why I used chalk paint. The chances of me forgetting what type of flower I put in them is very high, this way I can write on the bottles and remember.

After the chalk paint dried I twine wrapped the bottles. I wanted them to all be different so I wrapped different amounts. To Twine wrap all you need is a ball of twine and some glue and water mixture(just thin out the glue so its the consistency of Mod Podge). Simply brush the glue mixture onto the bottle and wrap the twine around the bottle. I always leave about 2 inches extra at the start in case it slides around a bit, then at the end, I can cut it to the correct length after it is dry. After the first two times around the twine doesn't move very easily so its actually very quick.
I am going to put them on my kitchen window sill.
Wednesday, April 3, 2013
Stain Glass Windows: Its Like Home Church
This project is probably one of my favourites. It was such a rare opportunity, that I don't think anyone else could have such a thing. I was in the right place at the right time.
My church was doing some renovations, and my Dad and Uncle were in charge. Our church sanctuary (where the Sunday morning service is held) had stain glass windows on both of the side walls. Since, due to previous renovations, one of the side walls was actually an interior wall, the windows were going to be taken out to be replaced with a simple flat wall. As soon as I heard this, I asked my Uncle if I could have the windows. Thankfully our church had no use for them, so one day after the Sunday service my Dad loaded two windows in the back of his truck to take home.
They were a lot different than what I expected when I received them. I was expecting a window with a small simple, but as you can see in the picture, that's not what I got. I had to change my plans a bit, but I think it worked out in the end.
I started by sanding down all the wood. There were layers upon layers of hideous 80's church color oil based paint, so it took a long time. I then tapped up the windows with painters tape so that I didn't get paint on the glass when I painted.
I was hoping for a beachy/vintage look so I wanted a lot of the wood grain to be showing. To do this I added some leftover white paint to my clear varnish. I painted the whole thing with the faintly white varnish. I liked the effect on the wood after the first coat, and didn't want it any whiter, so I used a different un-tinted can of varnish for the second coat. After the varnish dried for two days I took off the tape, and scraped all the dirt and old paint splatters off the windows.
There was not a lot of steps, but the sanding took forever, so it felt a lot harder than it was. I also later found out that the windows are fake stain glass and not real. It looks the same to me in the end.
My church was doing some renovations, and my Dad and Uncle were in charge. Our church sanctuary (where the Sunday morning service is held) had stain glass windows on both of the side walls. Since, due to previous renovations, one of the side walls was actually an interior wall, the windows were going to be taken out to be replaced with a simple flat wall. As soon as I heard this, I asked my Uncle if I could have the windows. Thankfully our church had no use for them, so one day after the Sunday service my Dad loaded two windows in the back of his truck to take home.
They were a lot different than what I expected when I received them. I was expecting a window with a small simple, but as you can see in the picture, that's not what I got. I had to change my plans a bit, but I think it worked out in the end.
 |
| Photo by David Chung |
What I did:
 |
| Photo by David Chung |
I was hoping for a beachy/vintage look so I wanted a lot of the wood grain to be showing. To do this I added some leftover white paint to my clear varnish. I painted the whole thing with the faintly white varnish. I liked the effect on the wood after the first coat, and didn't want it any whiter, so I used a different un-tinted can of varnish for the second coat. After the varnish dried for two days I took off the tape, and scraped all the dirt and old paint splatters off the windows.
 |
| Photo By David Chung |
Wednesday, March 27, 2013
Window Shutters: When your blinds just wont cut it
I hate blinds. I especially hated them when I was a kid. In my parents old house we had Venetian Blinds, which are the skinny metal blinds that were probably popular in the 80s and 90s. I think I hated them for a number of reasons.
First of all, as a teen, the cool thing to do is to sleep till noon in the summer and on weekends. Blinds do not keep enough light out of the room to sleep until noon. You need to have curtains if you want to keep a substantial amount of light out. I'm sure there is a logical reason, that I have yet to discover, why a person would want both curtains and blinds. In my mind they serve the same purpose, why have both. Since my parents made the choice for blinds, which are not effective at light blocking, I didn't like them.
Another reason I don't like blinds, is because of the amount of dust they collect, and the difficulty to clean them. When I was a child I cleaned my blinds when I would get in trouble. I was a bit odd that way. I didn't clean them as a punishment, I cleaned them out of guilt. I would get in trouble from doing something that I knew was wrong, and I would just feel so guilty, that I would go to my room and clean my blinds(and other parts of my room). Now, looking back, I wonder if I was subconsciously trying to get back into my parents good books. As a result, I don't like blinds now, probably because I associate them with getting in trouble.
Finally, I don't like blinds, because they are hard to use. I moved to a new place when I was about 16. I was not a weak 16 year old girl, I was unusually tough. However, the first time I tried to open my blinds, I actually couldn't do it. I had to have my brother come into my room, and pull on the cord as hard has he could, just to open my blinds. I don't know if they were stuck, or the inside parts were rusty, but never the less, I could not open them. There are many other frustrating time I have had with broken blinds, such as when you pull on the sting only one side goes up(which is why I cant open the blinds in my room right now), or you try to lower them and everything is too tangled to figure out what happened, and other annoying things.
As a result, when I moved into another room in my parents house, I immediately took down the blinds, and started to look for a solution One day shortly after, my Mom came home with four random shutters from an antique store. We decided they would be my new window coverings. To be honest most of this was not completely my project, but my dad's, because I cant use the table saw.
 |
| Photo by David Chung |
Another reason I don't like blinds, is because of the amount of dust they collect, and the difficulty to clean them. When I was a child I cleaned my blinds when I would get in trouble. I was a bit odd that way. I didn't clean them as a punishment, I cleaned them out of guilt. I would get in trouble from doing something that I knew was wrong, and I would just feel so guilty, that I would go to my room and clean my blinds(and other parts of my room). Now, looking back, I wonder if I was subconsciously trying to get back into my parents good books. As a result, I don't like blinds now, probably because I associate them with getting in trouble.
 |
| Photo By David Chung |
As a result, when I moved into another room in my parents house, I immediately took down the blinds, and started to look for a solution One day shortly after, my Mom came home with four random shutters from an antique store. We decided they would be my new window coverings. To be honest most of this was not completely my project, but my dad's, because I cant use the table saw.
 |
| Photo by David Chung |
What I did:
I started by giving the shutters a bit of character. I sanded the corners and some of the slats to give it a bit more of a worn look. I painted the blue one because it was red originally, but I didn't need to paint the others because they matched the colours of my room.
My dad had to build a frame around my window to hang the shutters on, because the window didn't have a frame to start with. I painted and sanded parts of that as well so that it matched the shutters.
We put small hinges between the two shutters so that they would fold in half. Then, we put larger hinges onto the shutters and the frame, so that the shutters would open off the window.
The project was not particularly complicated in the end, it just took some time trying to figure out which direction to put the hinges on, so that it would open properly.
 |
| Photo by David Chung |
Monday, March 25, 2013
Medicine Cabinet: Long over due
I went to this garage sale because it was a fundraiser for some friends going to Seeds of Hope, an orphanage in Zambia. Since I had been to Seeds of Hope with them before, I had a soft spot for the ministry, and was defiantly going to check out their garage sale. Also, I just love garage sales.

It was a huge garage sale that took up our entire church gym. Being that I lived with my parents at the time, and was in university, not only did I not have money to spend, but I didn't have a lot of space to put things. I saw this beat-up medicine cabinet that was missing a mirror, and knew it had potential. I bought it for a very discounted price of $1. I was busy in school at the time, and didn't have a specific plan for it so I put it in my parents garage for the time being.
Two years later my Mom asked if she could throw it out because I wasn't using it. I obviously protested! I was going to fix it up immediately! Again a year or two later when we were having a garage sale at my parents house she asked if we could sell it. Though I successfully convinced her that I would fix it up, I knew I needed to get on it soon.
Six months later, it was summer, I was done school, and I was ready to finish up (or in this case start) some of my old projects.

What I did:
Since the Medicine Cabinet was small I decided to sand the whole thing by hand. It was tough, but really only took about hour. I made sure to sand some areas alot more than others so that it would have the worn look. Around the handle and on the corners mostly.
There was a lot of nice wood grain on the sides so I didn't want to paint over that. Again I wanted it to match my other furniture in a way, but I didn't want it to blend in. I did a nice dark varnish as the base coat and then added a bit of white paint in the second coat, as I had done before, to give it a beach look.
I found a spare door nob and put that on in place of the broken one that was there. Since I had no intention of putting it in my bathroom and using it for medicine I didn't feel a need to put a new mirror on the front. I wanted to make it a chalk board. I love being organized and writing lists, so chalk boards appeal to me.
The company I work for owns the building, and one of out tenants is a Tile company. I went over there with a plastic container and asked if they had some fine tile grout left over. They did and filled up my container for free! To make the chalk paint I mixed 2 TBS fine tile grout with one cup of paint. I painted onto the empty space and let it dry.
I am finished. I have it mounted on my wall, and am very pleased with the finished product.


Friday, March 15, 2013
Photos: Why I dont take my own
Im going to start by saying: I like to think I can take pictures. But, really I'm lying to myself. Taking pictures is cool, and in the Vancouver area its the "Hypster" thing to do. Especially in the circles I run in. I'm pretty sure I have 10+ friends who are "professional" photographers. Not to say that they aren't good. Some of my closest friends are really good. I think they are at least.
My profile picture is me holding a camera, because that cool and trendy. I didn't take the picture, so how do you know I'm a photographer. Sneaky I know.
There are times when I want to be a photographer. Not semi-professionally, I just want to take nice pictures of my life. I got a decent camera for Christmas one year. Its not amazing, but its not a point and shoot. Some times Ill take pictures, then other times, I just want to enjoy the moment.
I am currently not in a photographer phase. I got engaged on an amazing date in Victoria BC a few months ago. It was a beautiful day, and I brought my heavy camera around with me everywhere. I didn't take even one picture.
In the end, weather I like taking pictures or not, does not make my pictures any good. I am a crafter, that doesn't mean that I'm good at all things artistic. I like to create things, but technology generally is not the easiest for me.
In short, I'm writing this blog today to say thanks to my brother. He, so far, has taken almost all of my pictures. He likes it, and is pretty good. He is not a professional, but really enjoys taking pictures, has so talent, has a really nice camera. These are some other random cool photos taken by +David Chung:
 |
| Photo credit: David Chung |
 |
| Photo credit: David Chung |
 |
| Photo credit: David Chung |
 |
| Photo credit: David Chung |
Friday, March 8, 2013
Necklace Holder: I Need Two!
I now realize, looking back, that I did not make it big enough. I have way too many necklaces for just four nobs. Maybe the problem is that I have too many necklaces that I never wear. I should probably recycle some of those necklaces. Who am I kidding, that is never going to happen.
It took me a while to get started because I needed to find the perfect piece of drift wood. It was late fall when I decided to start this project, and trips to the beach are just less prevalent when its cold outside. I eventually made it there, but of coarse it was dark outside so the search was not much easier. I found one that I liked. It was so perfect. The right size, the jagged edges, extremely worn, and everything I hopped for! Then, I turned it over, and it was burnt on the bottom. It was too bad, but I was already in love with it. I decided to make it work.
What I did:
I started by drilling 4 holes through the drift wood. The holes were in the middle viertically, but not to the edges of the drift wood, because I wanted the sides to stick out.I choose a random collection of nobs to put on. This was partly because I liked the eclectic style, and partly because there were not four of the same. I placed the nobs through the holes and ran into my first problem.The screws were not long enough to make it to the back.
I took it to the shop, and used the table saw* to make the piece thinner. It worked for the most part, except for one screw that was really short. I had to drill a larger hole in the back to fit the bolt into. I got the screws in and I was happy with it! I knew, however, that my landlord would not be happy. If I hung it on the wall the way it was, the screws would scratch the wall because they stuck out the back.
To fix this it was not hard at all. All I had to do, was put two small wooden pieces on the back, that stuck out further than the screws. That was a quick and easy fix. Finally, I just had to hang it. I cut a long piece of rusty wire, because I wanted the rustic/vintage look. I wrapped each end around the screws tightly to hold it in place. I put a nail in the wall and hung it on the nail. That's it!

*My Dad used the table saw. I would kill myself if I tried.
Wednesday, March 6, 2013
A Necklace: Inspired by Octopus balls
One of my favourite ways to spend a summer weekend evening, is at the Richmond Night Market, or is it the Summer Night Market. Ill be honest, I get so confused which is which. Regardless, there is so much great stuff. I always used to buy all my school supplies such as pens, notebooks, pencil cases, ect. there. I also bought my phone case, some pants, jewellery, movies, and a LOT of food from there.
My favourite part of the evening, is when we walk through the food isle. It smells so good, and I get so excited about all the food that I want to eat! Its so crowed in the food isle that I often consider taking a squid leg out of a stranger's bowl and hoping they don't notice. I haven't done this yet though.
The one thing that I buy most often is Octopus balls. It might not be my number one favourite, but the price is right, there is never a huge line up, and they are very delicious! If you have never had an Octopus ball I will advise that, as long as you like sea food, you try them! They are a doughy ball with Octopus chunks in it, simple and amazing! I was first introduced to this beauty, by my good friend +Anne-Marie MacIntosh. She deserves some cred.
Since I almost always over eat when I am there, the rest of the night is slightly less enjoyable, but still a good time none the less. When the boys are staring at either game or swards I sneak over to the Jewellery booths.
Once I saw a necklace that I loved, but I was short on cash and decided not to buy it. However, I decided to make it! Now, looking back, I am not sure why I loved it. I think I have only worn it once since I made it two years ago. I still like it, but its just doesn't go with my outfits. Maybe someone else will appreciate it more than me.
 |
| Photo Credit: David Chung |
What I did:
I bought a cheep grey necklace from Value Village with bigger beads. I then picked a green ribbon that matched. I threaded a medium sized needle with thick sewing thread*. First, I strung the ribbon leaving a foot at the end. I then strung a bead, and wrapped the ribbon to the top of the bead and strung it again. Basically you sting the ribbon back and forth, but put a bead between each ribbon string. Follow the pattern until you either run out of beads, or its long enough. Cut the ribbon so that there is a foot remaining after the last bead. Tie a nice bow with the two long pieces of ribbon to close the circle. Finally, thread the sting through the bow a few times to ensure it does not come undone. Tie the sting and cut it off. Its finished!
*I would suggest not using anything with Spandex (stretchy)
Monday, March 4, 2013
A Dresser: More than just storage
It was time to retire my childhood dresser. It was falling apart, and it was so huge, there was not enough space in my new room. I went to Value Village to find a new one. The one I picked was much smaller, but still falling apart. My handy-dandy carpenter father fixed the top so it stayed together. Knowing him, it is now the most stable part of the whole dresser.
What I did:
I didn't sand the paint off the dresser completely this time. I just gave it a light sanding to prep it for painting.
I painted the whole thing the same green as my book shelf. I did two coats of the green, and let it dry for a few days. After it had dried really hard, I pulled out the sander again. I sanded down all the corners, edges, and handle spots. This gave it a nice vintage look. The reason that I didn't sand it down before, was so that the other colours would show through at the sanded spots. You can see mostly white, but in some spots there is a hint of light blue.
I kept it with some Anthropology nobs for a while, but recently decided to update the handles. I went into my box of beach collections, and picked out four shells that were about the same size. I simply drilled through the flat spots where I wanted the screws to go, and then screwed them into the dresser. Since I used old screws that I found lying around, they are noticeable against the white shells. Maybe one day I will paint the screws white, so they don't stand out too much. Who knows.
 |
| Photo Credit: David Chung |
Friday, March 1, 2013
Beach Fever: Pencil Case
I have always been a lover of everything beach since I was little. I think my beach decorating started after I went hiking on Nootka Island.
View Larger Map
Nootka is a great 4-5 day hike. I did it when I was about 13 with my parents, good friend Maddie, and her parents. The hike was around the coast with some beautiful views, and a real wild life experience. On the second last day of the hike there was an old fisherman shack that was covered in buoys. We tied a few to our packs to take home with us, and thus my beach fever began.
If I remember correctly the first room I started to transformed was my bathroom. I hung the buoys on the walls, and decked out my soap dispenser and tooth brush holder. Since that time my younger brother took that room, and as a result my crafts have become grungy, so I cant take pictures of them.
I did another craft around the same time that was quite similar. I had an old pencil case that had pictures of Winnie-the-Pooh on it. I was defiantly past the Winnie stage, but still like the pencil case, so I decided to transform it.
What I did:
This was a simple craft, and I think it is actually really common right now. I bought a ball of twine from the dollar store,* and pulled out some old liquid school glue from the junk drawer. I put some glue all the way around the pencil case starting at the bottom. I used my finger to spread the glue around, which I soon realized was not the best choice. I would suggest using an old paint brush to spread the glue. Starting at the bottom I tightly tucked the twine into the edge of the pencil case. I went all the way around the box and started working my way up.
I found that the slower I went, the easier it was. I would add the glue as I went so it wouldn't dry out too early, but if the glue was too runny still, the twine would move around too easily. Going slow allowed the glue to dry just enough, so that when I would make it all the way around, I could place the new row tightly against the last without having it pop out.
Finally, to finish it off, I added a simple shell to spice it up a little, and put the pens inside.
 |
| Photo Credit: David Chung |
*I used hemp on my projects for the bathroom. I like how it looks better because there are less fly-a-ways. However, a ball of twine is about $1 and a ball of hemp is about $10. I thought the fly-a-ways were a great compromise.
Wednesday, February 27, 2013
A Little About Me
I thought I would share a little about myself and this blog. Mostly just for interest sake, and because its my blog so I can do what I want.
I think the stereotypy of a person who likes crafts is something like this: Woman, has kids, stay at home Mom, probably 40+ unless she had kids when she was young, enjoys reading Anne of Green Gables with some herbal tea, and probably owns a quilted purse, jacket, vest, and maybe even pants that they wear regularly. I'm also not saying that I think that is a bad thing, my Mom, who fits many of those things, is my crafting inspiration. I'm just saying its a stereotype.
I am: a Woman, and own a quilted purse. That's it! I don't even really like babies, I am hoping to have a thriving career I am in my early 20's. I really don't like reading, especially fiction. I drink black tea 98% of the time, and I think quilts are amazing...for beds and couches.
I'm not saying all crafters are like that, I actually have some really cool friends that craft. I think Etsy is helping young people that like crafting to realize they are not alone! Its just a stereotype that I don't fit. I also think this stereotype is changing as young crafters are coming out of the closet.
As Far as crafting goes I do it for a variety of reasons:
1-I see something I like and am not willing to spend the money that it costs so I make it myself
2-I have an idea of something I want, and its way cooler when you make it your self
3-I enjoy it. Its a hobby-thats probably the main reason
I started crafting when I was a kid, as I would suspect most kids do. I painted Easter eggs, made Christmas tree decorations, colored pictures, and the whole lot. I hope skills have increased since then :S.
I have never done one type of craft, I like variety and want to try it all. I like to refurbish furniture, I crochet, I make jewellery I am in the process of making all the decorations for my wedding, I love to work with clay, I make headbands, I love to paint, and I'm sure there is more. The only thing that I cant do is sew. This is ironic because my Mom is an amazing seamstress. She used to own her own clothing company. But she never taught me how, and now I can't even patch holes in my jeans.
Im not an expert at any craft because I usually do something once, learn as I go, and then never try again to improve and learn from my mistakes.
Other than crafting I have a normal life. I have a business degree and work as an office manager. I Enjoy sports, but generally am not good at them. I know and love Jesus, and crafting is one of my ways that I worship him. I love the beach and the ocean, I love to volunteer and lean about cultures. One of my biggest dreams and aspirations in life is to make a difference in reducing poverty.
I think the stereotypy of a person who likes crafts is something like this: Woman, has kids, stay at home Mom, probably 40+ unless she had kids when she was young, enjoys reading Anne of Green Gables with some herbal tea, and probably owns a quilted purse, jacket, vest, and maybe even pants that they wear regularly. I'm also not saying that I think that is a bad thing, my Mom, who fits many of those things, is my crafting inspiration. I'm just saying its a stereotype.
I am: a Woman, and own a quilted purse. That's it! I don't even really like babies, I am hoping to have a thriving career I am in my early 20's. I really don't like reading, especially fiction. I drink black tea 98% of the time, and I think quilts are amazing...for beds and couches.
 |
| Who knows, maybe I will own something like this when I am 70. Not for now. |
As Far as crafting goes I do it for a variety of reasons:
1-I see something I like and am not willing to spend the money that it costs so I make it myself
2-I have an idea of something I want, and its way cooler when you make it your self
3-I enjoy it. Its a hobby-thats probably the main reason
I started crafting when I was a kid, as I would suspect most kids do. I painted Easter eggs, made Christmas tree decorations, colored pictures, and the whole lot. I hope skills have increased since then :S.
 |
| Some classic craft time |
 |
| I some how knew that painting outside on an easel increases skills |
 |
| Clearly I was very skilled with stickers |
 |
| I remember being embarrassed by this painting because I was the only person who made a nose the way I did. |
Im not an expert at any craft because I usually do something once, learn as I go, and then never try again to improve and learn from my mistakes.
Other than crafting I have a normal life. I have a business degree and work as an office manager. I Enjoy sports, but generally am not good at them. I know and love Jesus, and crafting is one of my ways that I worship him. I love the beach and the ocean, I love to volunteer and lean about cultures. One of my biggest dreams and aspirations in life is to make a difference in reducing poverty.
Tuesday, February 26, 2013
A breifcase: From Trash to...Cosmetic Organizer
I have always loved vintage briefcases and suitcases. I remember when I was a little girl, and would go antique shopping with my mom, I would always want her to buy either sewing dressforms, or suitcases. I still threaten to buy her dressforms every year for her birthday and Christmas, but since I have my own place now, I want all the suitcases to myself.
I was leaving my parents house one day and just two houses down I spotted my prize. It was garbage day and there were two briefcases sitting on the curb. My day was complete!
One was brown and only need a 5 min polish to get rid of some dirt. The other was a hard black case that was nice, but now really what I was wanting. So I went on Pinterest to get a few ideas; honestly I didn't find much I liked. Since I don't actually need a briefcase for normal use, I decided I was going to use it as a cosmetic organizer. So I decided to start, and hoped for the best.
I taped the metal frame so that I could paint freely. I started with a primer because the case was plastic, and I didn't want the paint to chip off. I then found some blue paint, and mixed a few until I came up with a blue that I liked. I did two coats of the blue to be sure it covered really well. I waited probably a week before I went to the next step, because I want to be sure the paint had time to harden.
I measured out where the green lines should be, and taped the space off for perfect lines. I again mixed a few colors to make sure the green matched the blue. Again, I painted two coats of the green, just because it didn't fully cover the first time. Finally, i took the tape off and was very pleased with the result.
Once I finished the outside I started on the inside. I pulled out all of the insert parts so it was just an empty shell. This was harder than it sounds, because this briefcase was made tough, and the seams were no exception! I cut up an old cereal box and shaped it into small boxes, to use separate the sections.
It is big enough inside to hold almost everything except my hair dryer. Now I can get ready in my bedroom, and not worry about my room mates showering when I want to put on my make-up. Better yet, it is decorative at the same time!
I was leaving my parents house one day and just two houses down I spotted my prize. It was garbage day and there were two briefcases sitting on the curb. My day was complete!
One was brown and only need a 5 min polish to get rid of some dirt. The other was a hard black case that was nice, but now really what I was wanting. So I went on Pinterest to get a few ideas; honestly I didn't find much I liked. Since I don't actually need a briefcase for normal use, I decided I was going to use it as a cosmetic organizer. So I decided to start, and hoped for the best.
What I did:
 |
| Photo Credit: David Chung |
I measured out where the green lines should be, and taped the space off for perfect lines. I again mixed a few colors to make sure the green matched the blue. Again, I painted two coats of the green, just because it didn't fully cover the first time. Finally, i took the tape off and was very pleased with the result.
Once I finished the outside I started on the inside. I pulled out all of the insert parts so it was just an empty shell. This was harder than it sounds, because this briefcase was made tough, and the seams were no exception! I cut up an old cereal box and shaped it into small boxes, to use separate the sections.
It is big enough inside to hold almost everything except my hair dryer. Now I can get ready in my bedroom, and not worry about my room mates showering when I want to put on my make-up. Better yet, it is decorative at the same time!
 |
| Photo Credit: David Chung |
Thursday, February 21, 2013
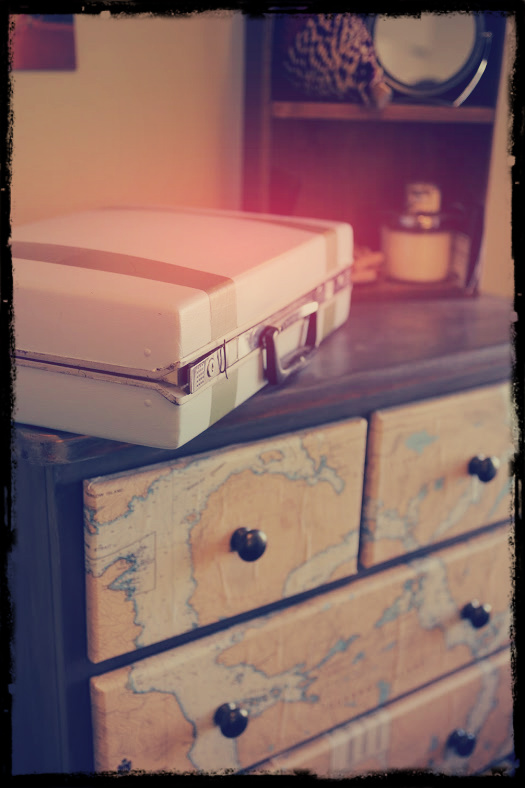
Dresser: From Boy to Adult
I was in need of a new dresser, because my new place didn't have enough drawers for me to store my clothes. My boyfriend was only using one of the dressers from his bedroom suite, so he offered me the other one.
I already knew that I was only going to be living in my current house for 4.5 months, so the dresser was not a permanent thing. Regardless I could NOT put this dresser in my room. With the combination of sealed pine, and forest green stain, it looked like it belonged to a 7 year old boy. I'm sure it was appropriate when he got it, but it was going to be the downfall of my perfect room (which still, two months later, has only two small pictures hanging on the wall). On top of that I was hoping we were getting married this summer, so I knew this dresser was going to end up in our house eventually.
Since it was still technically Mark's dresser I had to get his approval. I presented him with a few inspirational pictures I found on the internet . To no surprise he picked the one with nautical charts. So I went to work!
I stained everything, except the front of the drawers, in a medium/dark brown stain. It was my first time staining so I got it everywhere-I have no tips to avoid this. I'm a messy person. The stain dried quickly and I was able to seal it the next day. I added a very small amount of spare white paint to the varnish.* This allowed me to lighten it up and to achieve a greyish vintageish look that I was wanting. I have done this to most of my other projects so it all matches. I applied a second completely clear coat of varnish for extra protection. I was able to move it to my room the next day, but didn't put anything on top for at least a week to give time for the varnish to harden.
I went to my local marine store and bought a chart. I picked the one of Quadra Island because it had significance to Mark. I pulled out the drawers and measured how the chart would fit on them. I was delighted to find that the chart was the perfect size! I cut out the chart so it was slightly bigger than the surface of the drawer. I then put a glue and water mixture on the surface of the drawers and placed the chart on top. I folded over the corners onto the back, and sealed everything with more glue and water.** I gave 3-4 coats of glue depending on how thick each coat was to fully seal the chart.
Finally I spray painted the nobs with a metallic bronze, so that they would look brassy and not woody.
Here is the final product!
*Water base with water base
**Tip: The chart bubbled a little bit after it began to dry (right side of middle drawer). This can be prevented by sealing the chart with glue and water before placing it on the drawer.
I already knew that I was only going to be living in my current house for 4.5 months, so the dresser was not a permanent thing. Regardless I could NOT put this dresser in my room. With the combination of sealed pine, and forest green stain, it looked like it belonged to a 7 year old boy. I'm sure it was appropriate when he got it, but it was going to be the downfall of my perfect room (which still, two months later, has only two small pictures hanging on the wall). On top of that I was hoping we were getting married this summer, so I knew this dresser was going to end up in our house eventually.
Since it was still technically Mark's dresser I had to get his approval. I presented him with a few inspirational pictures I found on the internet . To no surprise he picked the one with nautical charts. So I went to work!
What I did:
I took off the nobs and started sanding. I sanded everything down so there was no varnish and almost no forest green stain left. I had to sand the cracks by hand, but I still never fully got all the green out. It was ok to leave a little green in the cracks, because I was planning on having a darker stain on it.I stained everything, except the front of the drawers, in a medium/dark brown stain. It was my first time staining so I got it everywhere-I have no tips to avoid this. I'm a messy person. The stain dried quickly and I was able to seal it the next day. I added a very small amount of spare white paint to the varnish.* This allowed me to lighten it up and to achieve a greyish vintageish look that I was wanting. I have done this to most of my other projects so it all matches. I applied a second completely clear coat of varnish for extra protection. I was able to move it to my room the next day, but didn't put anything on top for at least a week to give time for the varnish to harden.
 |
| Photo Credit: David Chung |
Finally I spray painted the nobs with a metallic bronze, so that they would look brassy and not woody.
Here is the final product!
 |
| Photo Credit: David Chung |
*Water base with water base
**Tip: The chart bubbled a little bit after it began to dry (right side of middle drawer). This can be prevented by sealing the chart with glue and water before placing it on the drawer.
Subscribe to:
Posts (Atom)