Showing posts with label Beach Theme. Show all posts

Wednesday, October 1, 2014

Whalecome: How to paint perfect letters

I have always thought that Whalecome is the funniest word ever. Since the first time I heard it that is (yes I realize its not a real word). It would not be funny for everyone I guess, just nautical lovers probably. I have wanted to make a pillow that says Whalecome for a long time now and I finally did! In fact. I made 2. One for Joss (the sailboat in other posts) and one for Ca-Sea-Ta (my in-laws other boat).


 You can't deny that is the cutest thing ever!


Materials:

Pillowcase or other surface

Paint

Print-out of picture/writing on any type of printer paper

Sharp Ballpoint Pen

Paintbrush

Sponge

Scissors

What I did:

I chose to put this stencil onto a pillow case, I have also done a similar project on a piece of fabric to make a type of flag. This can also be done on wood, or many other options. 

First cut out the large area with the scissors. The whale in this picture was easy to cut with scissors, but once I got to the letters is when I had to get creative. They were too skinny for my scissors, and my exacto knife ripped the paper so there was not a straight edge. 

Tape the word onto the fabric where you would like it to be so that it does not move. You might need to cut down the paper to include only the letters.

Use your pen to puncture holes in the paper. Once you are done the full word it should look something like this. 

Take the paper off and underneath should look something like this. The second time I did this project I used way less dots because I realized I did not need so many. Less dots = faster.

Consider taking the tape off slowly incase your pen died or a letter was missed for some reason.

Paint inside the dots. 

Finally use the sponge to paint inside the whale stencil. (I painted the whale first, order does not matter) A sponge will give the best results with the paper because you will be only dabbing the fabric. There is almost no chance that the stencil will run on the edges. 

Finished!

Tuesday, September 16, 2014

Centre Pieces: Paper Flowers

One of my favorite things about paper flowers is that they never die! You can have them in any color you like, they don't need any water, and you never have to think about refreshing your table when guests come over. So handy!
For my wedding I was not particularly worried about the flowers wilting before the reception started. I decided to have paper flowers for two reasons. First off, when I learned how expensive flowers are I was not willing to spend that much! Also, and more importantly I love making everything by hand, and love the look of paper flowers, how cool is it to know that the Bride made EVERYTHING on the table!

Materials:

Paper. Heavier than copy paper, but not as heavy as card stock (I used 67lb paper)

Chopsticks (the cheap wooden ones from take-out)

Green Paint

Liquid Glue

Scissors

Paintbrush

What I did:

First, please note, that I based my flowers off This tutorial, but made some changes.


Cut out petals in approximately the same shape as the picture to the right. Cut some smaller, some more oblong, some larger, ect. Each flower will need approximately 10-14 petals. Feel free to fold the paper in half to cut out two at a time.


Next crumple up, and un-crumple all of the petals, so that when they are open again they are wrinkled.
The wrinkles of the petals allows them to look a bit more realistic, less like paper and a bit more like silk. It gives them some texture.

Paint the chopsticks green. Be sure to paint the whole chopstick because the top will likely be showing like in the picture below.

Place a small line of glue at the base (flat side) of one petal. You will be working from the centre of the flower to the outside, so the first petal you choose should be one that you want in the centre. 

Wrap the bottom of the petal(with the glue) around the chopstick(the fat end). depending on what type of flower you are going for will determine what angle you wrap the flower. I wrapped the petal around at about 40 degrees so that it was not too tight looking. 


Glue and wrap two more petals around the chopstick so that the three petals are evenly dispersed around the top of the chopstick forming the centre of the flower. 

Continue adding petals in the "windows" of the previous petals until you are satisfied with the size of your flower. With every subsequent layer increase the angle that you attach petal.

Once you have used up all your petals, or are satisfied with the number of petals stop adding more. Bend the petals out from the centre or at their tops so that they offer a more realistic look.


Finished!

Tuesday, September 2, 2014

Joss: Boat tiles and Nautical Rope Mirror

I have always loved all things nautical. It worked out that the first person I ever sailed with is now my husband. His parents own a Catalina 27. Its great, we mostly do just two hour afternoon trips in the bay, but we did our first overnight trip not too long ago. Since we have never taken an overnight trip before, we spent very little time inside the boat. Spending time inside motivated us to make some major updates to the boat.
This is a picture from our boat (of another boat)

There is a lot of work to do, among the regular maintenance that is required, but I started with the bathroom tiles because my husbands mom could not stand them.

Materials:

Ugly tiles

Martha Stewart Multi-Surface Paint

Painters tape

Paint foam roller and brush

Mirror

Hot Glue (or stronger glue if your mirror does not have a frame)

Nautical style rope

Sand paper (optional)

Rag and cleaning products

What I did:

Nautical Rope Mirror:

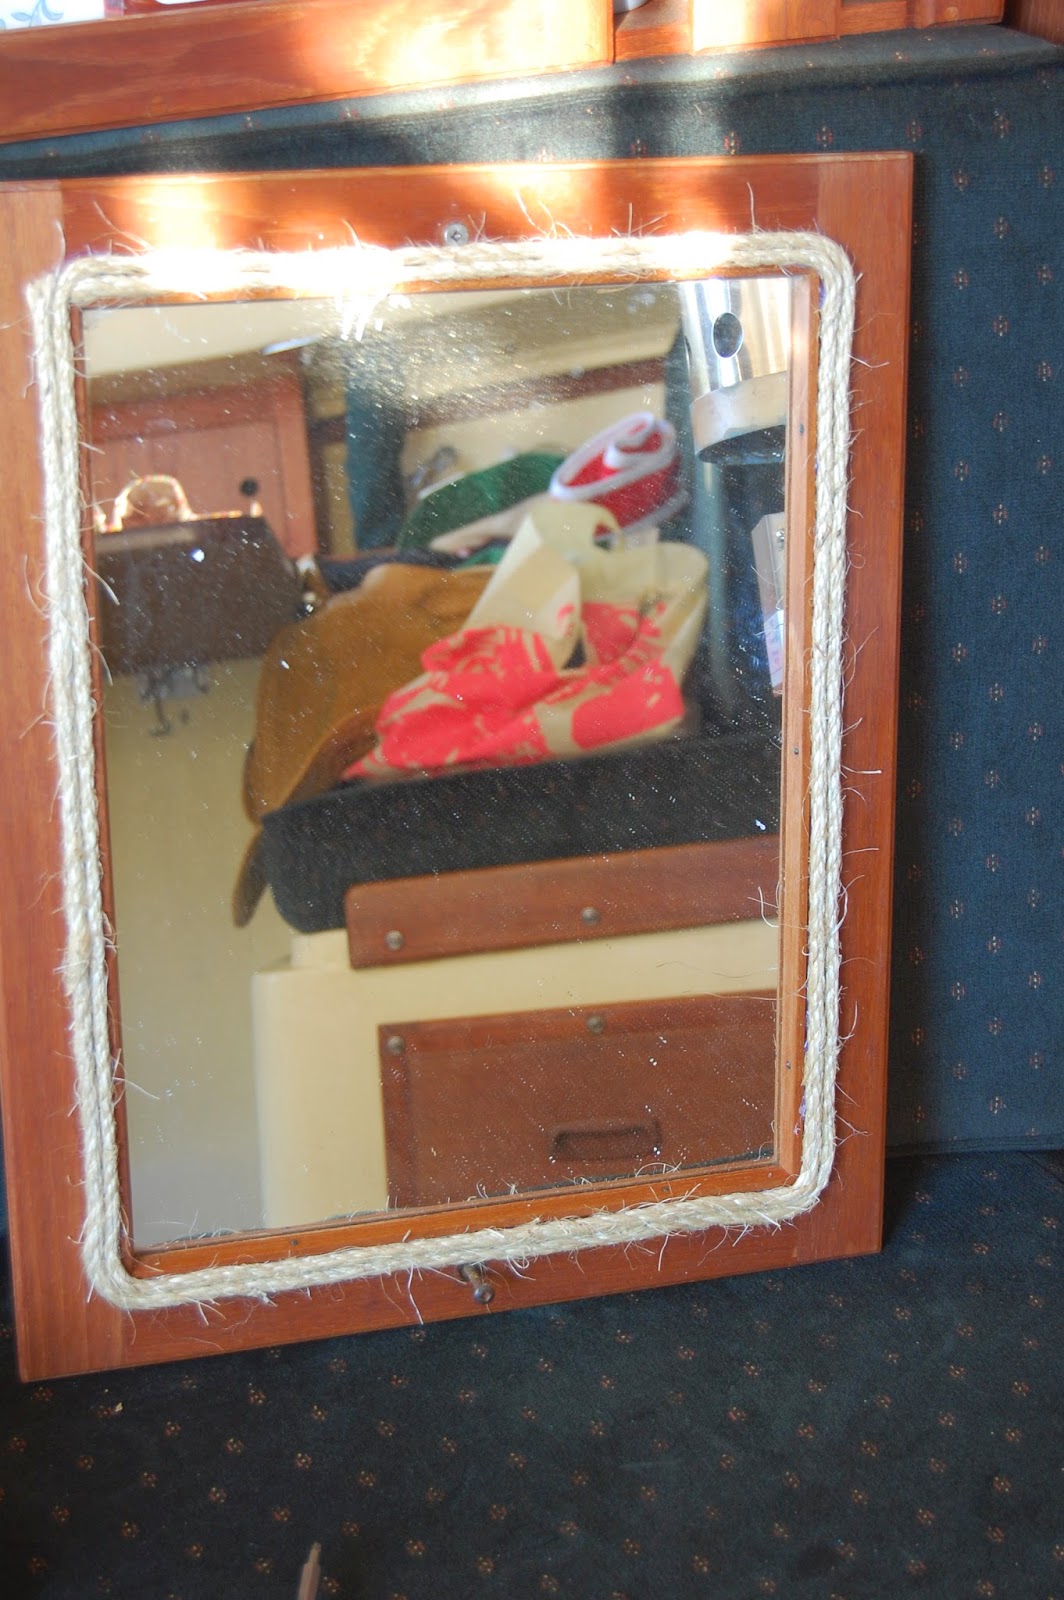
Not much required here. Hot glue rope around the mirror adding small sections of glue at a time and quickly placing the rope overtop (because it dries so quickly). I was only able to wrap three times because of the screws holding the mirror on the wall, but feel free to wrap as much as you want. Finish with the rope at the same place you started. 


Tiles:

Let me first note that this was for a small area with not too much traffic. I would use a different method for larger areas or more traffic. 

I forgot to take a before picture. Here is after one coat
you can see a bit of the dated flower design on the tiles. 
I started with a light sanding the tiles, nothing serious, just to be on the safe side. The product does not require it, but I wanted to be extra safe. I then cleaned the tiles with bathroom cleaner to remove any sanding dust, and other previous gunk that had built up over the past 20 years. Next tape the edges of the tiles to prevent painting the walls. 

Paint the tiles. I did my first coat with a brush to allow for a bit more coverage, and because the roller uses more paint and I only had a small bottle. Let the paint dry for 1-2 hours between coats as per instructions. Paint 1-3 more coats with a foam roller as required. I used white over cream tiles so 3 coats was enough, but I would suspect darker colors might only require 2 coats.  

Remove painter's tape. The paint can take up to a month to completely cure before you want to do any abrasive cleaning.

I tried to hide from the picture, but the bathroom is so tiny!


Wednesday, April 3, 2013

Stain Glass Windows: Its Like Home Church

This project is probably one of my favourites. It was such a rare opportunity, that I don't think anyone else could have such a thing. I was in the right place at the right time.

My church was doing some renovations, and my Dad and Uncle were in charge. Our church sanctuary (where the Sunday morning service is held) had stain glass windows on both of the side walls. Since, due to previous renovations, one of the side walls was actually an interior wall, the windows were going to be taken out to be replaced with a simple flat wall.  As soon as I heard this, I asked my Uncle if I could have the windows. Thankfully our church had no use for them, so one day after the Sunday service my Dad loaded two windows in the back of his truck to take home.

They were a lot different than what I expected when I received them. I was expecting a window with a small simple, but as you can see in the picture, that's not what I got. I had to change my plans a bit, but I think it worked out in the end.

Photo by David Chung

What I did:

Photo by David Chung
I started by sanding down all the wood. There were layers upon layers of hideous 80's church color oil based paint, so it took a long time. I then tapped up the windows with painters tape so that I didn't get paint on the glass when I painted.

I was hoping for a beachy/vintage look so I wanted a lot of the wood grain to be showing. To do this I added some leftover white paint to my clear varnish. I painted the whole thing with the faintly white varnish. I liked the effect on the wood after the first coat, and didn't want it any whiter, so I used a different un-tinted can of varnish for the second coat. After the varnish dried for two days I took off the tape, and scraped all the dirt and old paint splatters off the windows.

Photo By David Chung
There was not a lot of steps, but the sanding took forever, so it felt a lot harder than it was. I also later found out that the windows are fake stain glass and not real. It looks the same to me in the end.


Wednesday, March 27, 2013

Window Shutters: When your blinds just wont cut it

I hate blinds. I especially hated them when I was a kid. In my parents old house we had Venetian Blinds, which are the skinny metal blinds that were probably popular in the 80s and 90s. I think I hated them for a number of reasons.

Photo by David Chung
First of all, as a teen, the cool thing to do is to sleep till noon in the summer and on weekends. Blinds do not keep enough light out of the room to sleep until noon. You need to have curtains if you want to keep a substantial amount of light out. I'm sure there is a logical reason, that I have yet to discover, why a person would want both curtains and blinds. In my mind they serve the same purpose, why have both. Since my parents made the choice for blinds, which are not effective at light blocking, I didn't like them.

Another reason I don't like blinds, is because of the amount of dust they collect, and the difficulty to clean them. When I was a child I cleaned my blinds when I would get in trouble. I was a bit odd that way. I didn't clean them as a punishment, I cleaned them out of guilt. I would get in trouble from doing something that I knew was wrong, and I would just feel so guilty, that I would go to my room and clean my blinds(and other parts of my room). Now, looking back, I wonder if I was subconsciously trying to get back into my parents good books. As a result, I don't like blinds now, probably because I associate them with getting in trouble.

Photo By David Chung
Finally, I don't like blinds, because they are hard to use. I moved to a new place when I was about 16. I was not a weak 16 year old girl, I was unusually tough. However, the first time I tried to open my blinds, I actually couldn't do it. I had to have my brother come into my room, and pull on the cord as hard has he could,  just to open my blinds. I don't know if they were stuck, or the inside parts were rusty, but never the less, I could not open them. There are many other frustrating time I have had with broken blinds, such as when you pull on the sting only one side goes up(which is why I cant open the blinds in my room right now), or you  try to lower them and everything is too tangled to figure out what happened, and other annoying things.

As a result, when I moved into another room in my parents house, I immediately took down the blinds, and started to look for a solution  One day shortly after, my Mom came home with four random shutters from an antique store.  We decided they would be my new window coverings. To be honest most of this was not completely my project, but my dad's, because I cant use the table saw.
Photo by David Chung

What I did:

I started by giving the shutters a bit of character. I sanded the corners and some of the slats to give it a bit more of a worn look. I painted the blue one because it was red originally, but I didn't need to paint the others because they matched the colours of my room.

My dad had to build a frame around my window to hang the shutters on, because the window didn't have a frame to start with. I painted and sanded parts of that as well so that it matched the shutters.

We put small hinges between the two shutters so that they would fold in half. Then, we put larger hinges onto the shutters and the frame, so that the shutters would open off the window. 

The project was not particularly complicated in the end, it just took some time trying to figure out which direction to put the hinges on, so that it would open properly. 
Photo by David Chung


Friday, March 8, 2013

Necklace Holder: I Need Two!


The Necklace Holder is common right now. You could probably find 10 tutorials on pinterest that look exactly like mine! In fact my sister-in-law-to-be has a tutorial on it on her blog called I can eat that. Regardless I wanted to switch up where I put my necklaces, and I thought it was cute.

I now realize, looking back, that I did not make it big enough. I have way too many necklaces for just four nobs. Maybe the problem is that I have too many necklaces that I never wear. I should probably recycle some of those necklaces. Who am I kidding, that is never going to happen.

It took me a while to get started because I needed to find the perfect piece of drift wood. It was late fall when I decided to start this project, and trips to the beach are just less prevalent when its cold outside. I eventually made it there, but of coarse it was dark outside so the search was not much easier. I found one that I liked. It was so perfect. The right size, the jagged edges, extremely worn, and everything I hopped for! Then, I turned it over, and it was burnt on the bottom. It was too bad, but I was already in love with it. I decided to make it work.

What I did:

I started by drilling 4 holes through the drift wood. The holes were in the middle viertically, but not to the edges of the drift wood, because I wanted the sides to stick out.

I choose a random collection of nobs to put on. This was partly because I liked the eclectic style, and partly because there were not four of the same. I placed the nobs through the holes and ran into my first problem.The screws were not long enough to make it to the back.

I took it to the shop, and used the table saw* to make the piece thinner. It worked for the most part, except for one screw that was really short. I had to drill a larger hole in the back to fit the bolt into. I got the screws in and I was happy with it! I knew, however, that my landlord would not be happy. If I hung it on the wall the way it was, the screws would scratch the wall because they stuck out the back.

To fix this it was not hard at all. All I had to do, was put two small wooden pieces on the back, that stuck out further than the screws. That was a quick and easy fix. Finally, I just had to hang it. I cut a long piece of rusty wire, because I wanted the rustic/vintage look. I wrapped each end around the screws tightly to hold it in place. I put a nail in the wall and hung it on the nail. That's it!


*My Dad used the table saw. I would kill myself if I tried.

Monday, March 4, 2013

A Dresser: More than just storage

It was time to retire my childhood dresser. It was falling apart, and it was so huge, there was not enough space in my new room. I went to Value Village to find a new one. The one I picked was much smaller, but still falling apart. My handy-dandy carpenter father fixed the top so it stayed together. Knowing him, it is now the most stable part of the whole dresser.

What I did:

I didn't sand the paint off the dresser completely this time. I just gave it a light sanding to prep it for painting.

I painted the whole thing the same green as my book shelf. I did two coats of the green, and let it dry for a few days. After it had dried really hard, I pulled out the sander again. I sanded down all the corners, edges, and handle spots. This gave it a nice vintage look. The reason that I didn't sand it down before, was so that the other colours would show through at the sanded spots. You can see mostly white, but in some spots there is a hint of light blue.

I kept it with some Anthropology nobs for a while, but recently decided to update the handles. I went into my box of beach collections, and picked out four shells that were about the same size. I simply drilled through the flat spots where I wanted the screws to go, and then screwed them into the dresser. Since I used old screws that I found lying around, they are noticeable against the white shells.  Maybe one day I will paint the screws white, so they don't stand out too much. Who knows.


Photo Credit: David Chung

Friday, March 1, 2013

Beach Fever: Pencil Case

I have always been a lover of everything beach since I was little. I think my beach decorating started after I went hiking on Nootka Island.


View Larger Map

Nootka is a great 4-5 day hike. I did it when I was about 13 with my parents, good friend Maddie, and her parents. The hike was around the coast with some beautiful views, and a real wild life experience. On the second last day of the hike there was an old fisherman shack that was covered in buoys. We tied a few to our packs to take home with us, and thus my beach fever began.

If I remember correctly the first room I started to transformed was my bathroom. I hung the buoys on the walls, and decked out my soap dispenser and tooth brush holder. Since that time my younger brother took that room, and as a result my crafts have become grungy, so I cant take pictures of them.

I did another craft around the same time that was quite similar. I had an old pencil case that had pictures of Winnie-the-Pooh on it. I was defiantly past the Winnie stage, but still like the pencil case, so I decided to transform it.

What I did:

This was a simple craft, and I think it is actually really common right now. I bought a ball of twine from the dollar store,* and pulled out some old liquid school glue from the junk drawer. I put some glue all the way around the pencil case starting at the bottom. I used my finger to spread the glue around, which I soon realized was not the best choice. I would suggest using an old paint brush to spread the glue. Starting at the bottom I tightly tucked the twine into the edge of the pencil case. I went all the way around the box and started working my way up. 

I found that the slower I went, the easier it was. I would add the glue as I went so it wouldn't dry out too early, but if the glue was too runny still, the twine would move around too easily. Going slow allowed the glue to dry just enough, so that when I would make it all the way around, I could place the new row tightly against the last without having it pop out. 

Finally, to finish it off, I added a simple shell to spice it up a little, and put the pens inside.

Photo Credit: David Chung


*I used hemp on my projects for the bathroom. I like how it looks better because there are less fly-a-ways. However, a ball of twine is about $1 and a ball of hemp is about $10. I thought the fly-a-ways were a great compromise.